Shopping Cart


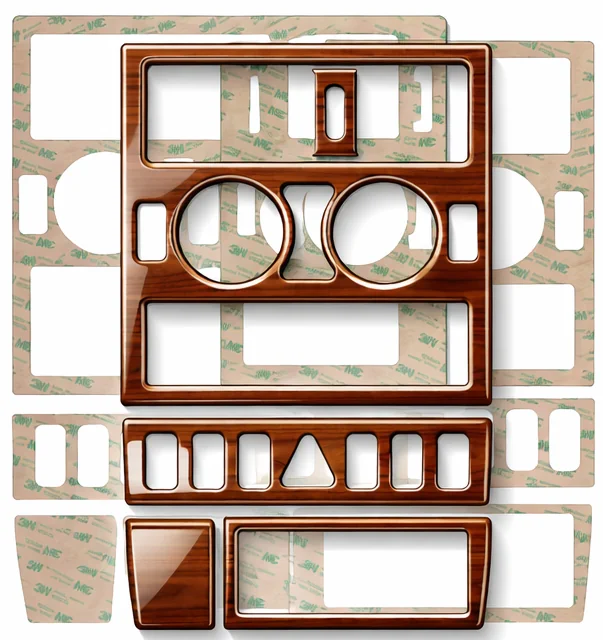
Honda Element 2007-UP SC Model, Full Set, Automatic Gear Interior Dashboard Trim Kit Dash Trim Dekor
€171.99
Tax included Manufacturing time 2-7 business days
- Vehicle Make: Honda
- Model: Element
- Variant: All Models and Versions; SC Model; Full Set; Automatic Gearbox
- Manufacturing Year: 2007-UP
- Quantity of Trim Parts: Full Set / as shown in product diagram
- New Reference: HDA-13A
- Position of Interior Customization Part: Dash Board, Doors, Air Vents, Glove Box, Steering Wheel, Light Switch, Gear Box
- 3D-effect through thick material, gives a high-gloss effect, burl wood, carbon, vehicle trim Woodline, Carbon Fiber, Gloss décor de luxe top quality
Honda Element (2007-Present) – SC Model; Full Set; Automatic Gearbox Dashboard Trim Kit – Premium Interior Upgrade
Upgrade your vehicle interior with the Honda Element 2007-UP SC Model, Full Set, Automatic Gear Interior Dashboard Trim Kit Dash Trim Dekor, a premium dashboard trim kit designed for a precise fit, elegant appearance and long-lasting everyday use.
This product is prepared for Honda Element (2007-Present) – SC Model; Full Set; Automatic Gearbox. It is ideal for drivers who want to refresh the cabin with a high-quality custom look without replacing original factory parts.
Vehicle Fitment
- Vehicle make: Honda
- Model: Element
- Version / variant: SC Model; Full Set; Automatic Gearbox
- Manufacturing year: 2007-Present
- Quantity of parts: Full Set / as shown in product diagram precision-cut pieces
- Product reference: HDA-13A
Premium Quality Materials
Our interior trim products are made from multiple layers of high-quality material and produced with modern CNC laser precision. The result is a clean, accurate fit that follows the original dashboard and interior contours of the vehicle.
High-gloss luxury finish available in burl wood, carbon fiber and other premium décor styles.
Most finishes are protected with a high-gloss, UV-resistant polyurethane coating. This helps protect the surface against scratches, sunlight and daily wear while keeping the interior easy to clean.
Interior Coverage
Depending on the vehicle version and kit configuration, this set is designed for: Dash Board, Doors, Air Vents, Glove Box, Steering Wheel, Light Switch, Gear Box.
Each component is pre-cut for vehicle-specific installation, helping create a factory-style appearance with a luxury burl wood, carbon fiber or custom décor finish.
Easy Installation
The trim pieces are supplied with strong pre-applied adhesive for simple installation. No special tools or professional skills are required. For best results, clean all surfaces carefully before fitting and install at room temperature or warmer to ensure maximum flexibility and adhesion strength.
We recommend allowing enough time for careful positioning and fitting. Once installed correctly, the kit gives your interior a fresh, premium and personalised look.
Why Choose Cockpitdekor?
- Vehicle-specific design for accurate fitment
- Premium burl wood, carbon fiber and luxury décor finishes
- Precision CNC laser-cut production
- Strong adhesive backing for secure installation
- Scratch-resistant and UV-protected high-gloss finish
- Suitable for cars, vans, trucks, motorhomes and SUVs
Choose this Honda Element (2007-Present) – SC Model; Full Set; Automatic Gearbox interior upgrade and transform your cockpit with a premium dashboard trim product made for style, quality and durability.

HDA-13A
100 Items
5483230010271
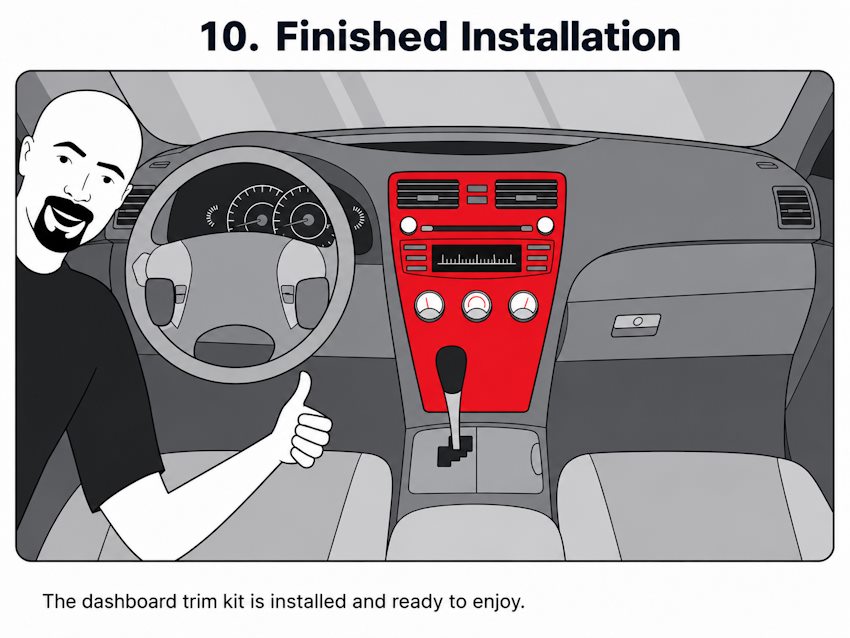
Dashboard Trim Kit Installation Guide
Installation Guides
Learn how to install a vehicle-specific dashboard trim kit without removing interior parts, how to clean the dashboard before applying 3M adhesive trim, how long installation usually takes, and how to remove old adhesive safely before fitting a new kit.
This guide is suitable for most self-adhesive interior dashboard trim kits, including high-gloss wood veneer, carbon fibre, brushed aluminium, piano black and other decorative finishes supplied with automotive adhesive backing.
Finished dashboard trim kit after installation.
Installation Guide Contents
- Complete installation overview
- Dash kit package checklist
- Tools needed for installation
- How to install a dashboard trim kit without removing interior parts
- How to clean the dashboard before applying 3M adhesive trim
- How long does a dashboard trim kit installation take?
- How to remove old interior trim adhesive safely
- Frequently asked questions
Complete Installation Overview
A dashboard trim kit is normally fitted over the existing dashboard and interior trim surfaces. For most vehicle-specific kits, no dashboard disassembly is required. The best result comes from careful dry fitting, correct cleaning, controlled adhesive preparation and firm pressure after alignment.
Most installation problems are caused by poor surface preparation. Silicone dashboard dressings, grease, dust, wax, interior protectants and cleaner residue can stop adhesive trim from bonding correctly. Always clean the bonding areas before applying the parts.
Main installation rules
- Check every part against the installation diagram before removing any backing film.
- Dry fit each part first to confirm position and alignment.
- Clean only the dashboard areas where trim will be applied.
- Remove any silicone dressing, grease or repellent residue before installation.
- Use adhesive promoter only if supplied or recommended for the kit.
- Warm the trim and dashboard slightly if the interior is cold.
- Apply each part carefully and press firmly around the full surface and edges.
- Avoid heavy cleaning or stressing the trim edges for the first 24 to 72 hours.
Dash Kit Package Checklist
Before starting, open the package and check that all supplied parts match the diagram. Do not begin the installation if a part appears damaged, missing or incorrect.
- 1 dashboard trim kit
- 1 dash kit diagram
- 1 printed installation sheet
- 1 warranty information sheet, if supplied
- 2 or more isopropyl alcohol wipes, depending on kit size
- 2 or more adhesive promoter sticks, if included with the kit
Tools Needed for Installation
- Hair dryer or low-temperature heat gun for cooler conditions
- Clean, lint-free, soft cloth
- Masking tape for a simple surface-cleanliness test
- Cotton swabs for tight corners
- Plastic trim tool if old adhesive or old trim must be removed
- 1 to 3 hours of working time, depending on kit size
How to Install a Dashboard Trim Kit Without Removing Interior Parts
A vehicle-specific dashboard trim kit is designed to fit over the existing dashboard and interior trim surfaces. In most cases, you do not need to remove original dashboard panels, air vents, buttons, radio surrounds, console parts or door trim panels.
Step 1: Dry fit every trim piece
Start by placing the trim pieces on the dashboard without removing the adhesive backing. This helps you understand where every part belongs and how the shapes align with the vehicle interior.
Use original dashboard details as alignment references:
- air vents
- radio or navigation frame
- climate control buttons
- dashboard switches
- cup holders
- gear selector frame
- door trim edges
Do not force a part into position. If a trim piece does not sit naturally, stop and check the diagram again.
Dry fit each dashboard trim piece before removing the adhesive backing. Use vents, buttons and dashboard edges as alignment points.
Step 2: Clean the dashboard surface
Clean the surfaces that will receive the trim pieces. Isopropyl alcohol wipes are normally used for final preparation. If the dashboard has been treated with silicone dressing, shine spray, wax or other repellent products, repeat the cleaning process several times.
A useful test is to apply a small piece of masking tape to the cleaned area. If the tape sticks easily, the surface is likely ready for installation. If the tape does not stick well, continue cleaning before applying the trim.
Step 3: Apply adhesive promoter if supplied
Some kits include adhesive promoter sticks. If supplied, use the promoter only on the bonding areas where the trim will be applied. Concentrate especially on corners, edges, narrow parts and curved sections. Do not cover unrelated dashboard areas.
Allow the promoter to dry according to the installation sheet before applying the trim. If the promoter stick is opened, use it during the same installation session because it can dry quickly.
Apply adhesive promoter only to the prepared bonding areas if it is supplied with the kit.
Step 4: Warm the trim if the vehicle interior is cold
If the temperature is low, gently warm the trim pieces before installation. A hair dryer is usually safer than a professional heat gun. Keep the dryer moving and keep it at a safe distance from the part. The goal is to make the trim slightly more flexible, not to overheat it.
Warming the dashboard area slightly can also help the adhesive bond correctly in cooler conditions.
Warm the trim gently if the interior temperature is low. Keep the heat source moving and do not overheat the material.
Step 5: Peel, align and tack lightly
Carefully peel the backing film from the adhesive side of the trim piece. Position the piece slowly and allow only a small area to make first contact. Use a fingertip to tack the part lightly while you make final alignment adjustments.
Once the full adhesive surface is pressed down, repositioning becomes difficult. Work slowly and install one part at a time.
Peel the adhesive backing carefully from the trim piece. Place the trim gently and check alignment before firm pressure. Use a fingertip to lightly tack the trim while adjusting position. Make the final alignment adjustment before pressing firmly.
Step 6: Press firmly across the full part
After the part is aligned, press it firmly into place with your fingers. Pay special attention to corners, edges, thin ends, curved pieces and areas around buttons or vents. Repeat the same process for all remaining dashboard trim pieces.
Press the entire trim surface firmly, especially corners and curved areas.
Step 7: Final clean and inspection
After all parts are installed, go back over every piece and press the edges again. Clean fingerprints and smudges from the glossy surface with a clean, lint-free cloth. If needed, use a safe glass cleaner or a small amount of rubbing alcohol on the cloth, not directly sprayed into switches or electronics.
Clean fingerprints and smudges with a soft lint-free cloth. Completed dashboard trim kit installation.
How to Clean the Dashboard Before Applying 3M Adhesive Trim
Correct cleaning is the most important part of dashboard trim kit installation. Even a perfectly shaped trim piece may lift at the edges if the surface contains silicone dressing, wax, grease, dust, oil or cleaner residue.
Recommended cleaning materials
- isopropyl alcohol wipes or suitable IPA-based cleaner
- clean lint-free cloth
- soft detailing brush for dust
- cotton swabs for narrow edges and corners
- masking tape for a quick adhesion check
Cleaning products to avoid before installation
- silicone dashboard sprays
- oily interior protectants
- wax-based cleaners
- polishing products
- wet installation fluids
- strong solvents on sensitive soft-touch surfaces
Cleaning procedure
- Remove loose dust with a soft dry cloth or detailing brush.
- Wipe the bonding areas with isopropyl alcohol wipes.
- Repeat cleaning if the dashboard was treated with silicone or shine dressing.
- Let the cleaned area dry completely.
- Apply masking tape to the cleaned area as a simple surface test.
- If the tape sticks easily, continue with installation.
- If the tape does not stick well, repeat the cleaning process.
Do not touch cleaned bonding areas with fingers before applying the trim. Skin oils can reduce adhesion, especially on narrow trim parts and curved edges.
How Long Does a Dashboard Trim Kit Installation Take?
Dashboard trim kit installation time depends on the number of pieces, dashboard condition, temperature and installer experience. A small kit can be installed quickly, while a large full set needs more time for dry fitting, cleaning, alignment and final pressing.
| Kit type | Typical installation time |
|---|---|
| 1 to 5 pieces | approximately 15 to 30 minutes |
| 6 to 15 pieces | approximately 30 to 60 minutes |
| 16 to 35 pieces | approximately 1 to 2 hours |
| 35+ pieces or full set | approximately 2 to 3 hours |
What affects installation time?
- number of trim pieces
- dashboard shape and complexity
- previous silicone dressing or interior protectant use
- interior temperature
- amount of adhesive promoter required
- curved or narrow trim shapes
- installer experience
Do not rush the dry fitting stage. Spending extra time checking the position of every part before removing the backing film can prevent alignment errors.
After installation, avoid heavy cleaning, picking at edges or stressing curved parts for the first 24 to 72 hours while the adhesive bond develops.
How to Remove Old Interior Trim Adhesive Safely
Old dashboard trim adhesive should be removed carefully. Interior dashboard plastics, vinyl and soft-touch coatings can be more sensitive than exterior painted panels, so aggressive scraping or strong solvents can cause damage.
Safe removal method
- Warm the old trim or adhesive slowly with a hair dryer.
- Keep the heat source moving and avoid overheating one spot.
- Lift the old trim gently using a plastic trim tool.
- Remove remaining foam tape and adhesive residue gradually.
- Use automotive adhesive remover only after testing on a hidden area.
- Apply cleaner to the cloth, not directly into switches or electronics.
- Finish by cleaning the bonding area with isopropyl alcohol.
- Let the surface dry fully before installing new trim.
Areas to protect while removing adhesive
- radio and navigation buttons
- climate control panels
- display edges
- air vents
- speaker grilles
- gear selector electronics
- soft-touch dashboard coatings
Do not use metal screwdrivers, razor blades or sharp tools on dashboard plastics. A plastic trim tool, controlled heat and slow adhesive removal are much safer for interior surfaces.
Frequently Asked Questions
Do I need to remove dashboard parts before installing a trim kit?
Usually no. A vehicle-specific dashboard trim kit is normally designed to apply over the existing interior surfaces without removing original dashboard panels.
Can I reposition a trim part after pressing it down?
Only during the first light contact. Once the adhesive surface is fully pressed onto the dashboard, repositioning becomes difficult and may damage the adhesive bond.
Why does dashboard trim sometimes lift at the edges?
The most common reasons are silicone dressing, grease, dust, low temperature, wet cleaner residue, poor edge pressure or insufficient cleaning before application.
Can I use normal dashboard cleaner before installation?
Not as the final preparation step. Many dashboard cleaners leave protective residue. Use isopropyl alcohol cleaning as the final surface preparation before applying adhesive trim.
How long should I wait before cleaning the dashboard after installation?
Avoid heavy cleaning or stressing the trim edges for the first 24 to 72 hours. Light fingerprint cleaning with a soft cloth is normally safe immediately after installation.
Can I install a dashboard trim kit in cold weather?
Yes, but the vehicle interior, dashboard surface and trim pieces should be warmed gently before installation. Cold adhesive is less flexible and may not bond correctly.
Can I install new trim over old adhesive?
No. Old adhesive should be removed first so the new adhesive backing can bond to a clean surface.
Can I use acetone to remove old adhesive?
Avoid acetone on interior plastics and soft-touch surfaces unless the material manufacturer confirms it is safe. Acetone can damage many dashboard materials.
Important Compatibility Note
Always confirm that the trim kit matches your exact vehicle make, model, year, dashboard layout and equipment version before installation. Do not apply a trim part if its shape, button cut-out or dashboard position does not match your interior.
Vehicle manufacturer names and model names are used only for compatibility identification. The dashboard trim kit is an aftermarket interior accessory and is not presented as an original vehicle manufacturer product.
Dashboard Trim Kit Material Guide
Material Guides
Choosing the right dashboard trim kit material is an important part of creating the interior style you want. A dark burl wood finish can give the cabin a classic luxury appearance, carbon fibre can create a sportier technical look, and aluminium can make the dashboard feel clean, modern and OEM-inspired.
This guide compares burl wood dashboard trim with carbon fibre trim, explains high-gloss polyurethane 3D doming, compares real wood veneer with UV printed wood effect trim, and helps you choose between dark walnut, light burl wood and aluminium interior trim.
Material Guide Contents
- Dashboard trim material overview
- Burl wood dashboard trim vs carbon fibre trim
- High-gloss polyurethane doming for dashboard trim kits
- Real wood veneer vs UV printed wood effect trim
- Dark walnut, light burl wood and aluminium interior trim comparison
- Popular finish options for dashboard trim kits
- How to choose a finish by interior colour
- How to choose a finish by vehicle style
- Care and cleaning for high-gloss trim surfaces
- Final material selection checklist
- Frequently asked questions
Dashboard Trim Material Overview
Dashboard trim kits are available in many styles, from classic wood finishes to modern carbon fibre, brushed aluminium, piano black, camo and strong solid colours. The correct material depends on the vehicle interior, the visual result you want and whether you prefer a luxury, sporty, technical or custom appearance.
| Material or finish | Best for | Visual effect |
|---|---|---|
| Burl wood | Luxury interiors, classic vehicles, executive cars, vans and trucks | Warm, premium, elegant and traditional |
| Dark walnut | Black, grey, beige and executive interiors | Deep luxury tone with a refined OEM-style look |
| Light burl wood | Light grey, beige, cream and classic interiors | Bright, warm and elegant wood appearance |
| Carbon fibre | Sporty interiors, performance cars and modern styling | Technical, dynamic and motorsport-inspired |
| Brushed aluminium | Modern cars, vans, trucks and clean technical interiors | Cool metallic, modern and precise |
| Piano black | Minimalist modern interiors | Clean, glossy and premium |
| Solid colours | Custom interiors and strong design themes | Bright, individual and highly visible |
| Camo or technical patterns | Off-road, utility, show car or custom builds | Specialised, bold and non-standard |
The material finish affects appearance, but it does not replace compatibility checking. Always choose the correct dashboard trim kit version for your vehicle make, model, year, gearbox type, air-conditioning controls, navigation system and dashboard layout.
Burl Wood Dashboard Trim vs Carbon Fibre Trim
Burl wood and carbon fibre are two of the most popular dashboard trim styles, but they create very different impressions inside the vehicle. Burl wood is chosen for warmth, luxury and classic interior styling. Carbon fibre is chosen for a sportier, more technical and performance-focused appearance.
Burl wood dashboard trim
Burl wood style trim is designed to give the dashboard a premium wood effect. It works especially well in executive cars, classic vehicles, motorhomes, vans, trucks and interiors where a warm high-gloss finish is preferred.
Main advantages of burl wood trim
- creates a premium luxury interior appearance
- matches classic and executive vehicle styling
- works well with black, grey, beige and cream interiors
- adds warmth to plain plastic dashboards
- available in dark, medium and light wood tones
- suits cars, vans, trucks, buses and motorhomes
Possible limitations of burl wood trim
- may look too traditional for very sporty interiors
- light wood tones can contrast strongly with black dashboards
- wood effect must be chosen carefully to match existing interior parts
- very large full sets can strongly change the cabin style
Carbon fibre dashboard trim
Carbon fibre style trim gives the dashboard a modern technical look. It is often chosen for sports cars, performance models, tuning projects and interiors where a dynamic, motorsport-inspired appearance is preferred.
Main advantages of carbon fibre trim
- creates a sporty and technical interior style
- works well with black, dark grey and modern dashboards
- matches performance and tuning themes
- available in black, blue, red, silver and other colour variations
- can make an older interior look more modern
- often pairs well with aluminium, black leather or sporty seats
Possible limitations of carbon fibre trim
- may look too sporty for classic luxury vehicles
- coloured carbon fibre can be very strong visually
- may not match existing factory wood trim
- large carbon fibre full sets can make the interior look more aggressive
Comparison table: burl wood vs carbon fibre
| Comparison point | Burl wood trim | Carbon fibre trim |
|---|---|---|
| Interior style | Luxury, classic, warm, executive | Sporty, technical, modern, performance |
| Best dashboard colours | Black, grey, beige, cream, brown | Black, dark grey, silver, red accents |
| Best vehicle types | Executive cars, classic cars, vans, trucks, motorhomes | Sports cars, tuning projects, performance models |
| Visual warmth | High | Low to medium |
| Technical appearance | Medium | High |
| Classic OEM-style look | Very strong | Moderate, depending on vehicle |
| Custom colour impact | Natural and decorative | Strong and dynamic |
When to choose burl wood
- You want a luxury dashboard appearance.
- Your vehicle has a classic or executive interior style.
- You prefer warm tones and natural-looking patterns.
- You want to upgrade plain black or grey plastic surfaces.
- You are styling a car, van, truck, bus or motorhome with a premium look.
When to choose carbon fibre
- You want a sportier interior.
- Your vehicle already has black, aluminium or performance-style details.
- You prefer a technical or motorsport-inspired finish.
- You want a modern alternative to wood effect trim.
- You are building a custom or tuning-style interior.
High-Gloss Polyurethane Doming for Dashboard Trim Kits
High-gloss polyurethane doming is a clear raised coating applied over the visible decorative surface of a dashboard trim part. It creates a smooth 3D effect, rounded edges and strong reflections. This finish is often described as 3D domed, deep gloss, high-gloss clear coat or polyurethane doming.
What polyurethane doming does
- adds a raised 3D surface effect
- creates rounded glossy edges
- increases visual depth
- makes wood, carbon and colour finishes appear richer
- creates a smooth premium surface
- helps protect the visible decorative layer from normal handling
Why 3D doming looks premium
The clear domed layer acts like a lens over the finish. On burl wood, it makes the grain look deeper and warmer. On carbon fibre, it enhances the technical pattern. On aluminium or colour finishes, it creates a glossy surface with clean reflections.
3D domed trim vs flat film
| Feature | 3D domed trim | Flat film or flat sticker |
|---|---|---|
| Surface appearance | Raised, glossy and rounded | Flat and thinner |
| Visual depth | High | Lower |
| Edge appearance | Rounded and finished | Flat edge |
| Luxury effect | Strong | Moderate |
| Handling feel | Smooth and thicker | Thin and film-like |
| Best for | Premium dashboard trim kits | Simple low-profile wrapping or temporary styling |
Benefits of high-gloss polyurethane doming
- luxury high-gloss appearance
- deep clear coat effect
- rounded 3D edge profile
- better visual depth than flat printed film
- suitable for wood, carbon, aluminium and colour finishes
- premium tactile feel
- strong showroom-style reflections
Important notes about domed surfaces
- Do not use abrasive pads on the glossy surface.
- Do not scratch the coating with metal tools.
- Do not bend small pieces aggressively before warming if the interior is cold.
- Clean fingerprints with a soft lint-free cloth.
- Avoid harsh solvents unless the product instructions confirm they are safe.
Real Wood Veneer vs UV Printed Wood Effect Trim
Wood-style dashboard trim can be produced in different ways. Two common approaches are real wood veneer and UV printed wood effect. Both can be finished with a high-gloss 3D domed clear coat, but they have different advantages.
Real wood veneer dashboard trim
Real wood veneer uses a genuine wood surface layer. This gives a natural grain structure and a premium material feel. Each wood pattern can have natural variation, which is often valued in luxury interiors.
Advantages of real wood veneer
- natural wood material
- premium authentic appearance
- unique grain variation
- excellent for luxury and classic interiors
- ideal for executive cars, prestige vehicles and motorhomes
- can create a very high-end cabin effect when domed and polished
Possible limitations of real wood veneer
- natural grain can vary from part to part
- matching large full sets requires careful grain and colour selection
- production may be more complex than printed finishes
- cost is usually higher than standard printed effect trim
- some exotic wood tones may be less repeatable between batches
UV printed wood effect dashboard trim
UV printed wood effect trim uses a printed decorative pattern that imitates wood. It is useful when consistent repeatability, strong colour control or a specific design is required. It can also reproduce patterns that are difficult or expensive to achieve with real veneer.
Advantages of UV printed wood effect trim
- consistent pattern and colour control
- good repeatability between production batches
- wide range of wood, carbon, aluminium and custom patterns
- can reproduce rare or stylised wood effects
- often easier for large catalog production
- works well under 3D domed clear coat
Possible limitations of UV printed wood effect trim
- not a natural wood material
- grain does not have the same organic variation as real veneer
- premium effect depends strongly on print quality and clear coat finish
- may look less authentic if the pattern resolution or colour is poor
Real wood veneer vs UV printed wood effect comparison
| Comparison point | Real wood veneer | UV printed wood effect |
|---|---|---|
| Material | Genuine wood surface layer | Printed decorative wood pattern |
| Pattern variation | Natural variation | Controlled and repeatable |
| Luxury authenticity | Very high | High if print and doming quality are strong |
| Batch consistency | Can vary naturally | More consistent |
| Design flexibility | Limited by available veneer | Very flexible |
| Best for | Premium, classic and natural luxury interiors | Large catalog, custom patterns and repeatable finish options |
| 3D domed compatibility | Excellent | Excellent |
Which one should you choose?
- Choose real wood veneer if you want the most authentic natural luxury appearance.
- Choose UV printed wood effect if you want consistent colour, repeatability and many finish options.
- Choose a 3D domed finish if you want extra gloss, depth and a premium raised surface.
- Choose the finish based on the interior style, not only the material name.
Dark Walnut, Light Burl Wood and Aluminium Interior Trim Comparison
Dark walnut, light burl wood and aluminium are three very different interior trim styles. Each one changes the cabin atmosphere in a different way.
Dark walnut interior trim
Dark walnut is a deep, elegant wood finish. It is suitable for vehicles where the goal is a premium executive look. It works especially well with black, dark grey, beige and cream interiors.
Best uses for dark walnut
- executive cars
- classic luxury vehicles
- black leather interiors
- grey or beige dashboards
- motorhomes and vans with premium interior conversions
- trucks where a warm luxury cockpit style is desired
Light burl wood interior trim
Light burl wood creates a brighter, warmer cabin appearance. It is a good choice when the dashboard or seats are light grey, beige, cream or tan. It can make the interior feel more open and less heavy than dark wood.
Best uses for light burl wood
- beige and cream interiors
- classic cars with lighter upholstery
- grey dashboards that need warmth
- luxury vans and motorhomes
- interiors where dark wood would look too heavy
Aluminium interior trim
Aluminium trim creates a clean, technical and modern look. It is less warm than wood but can make the dashboard look more precise, fresh and contemporary. It works especially well in modern cars, vans and trucks with black or grey interiors.
Best uses for aluminium trim
- modern vehicle interiors
- black and dark grey dashboards
- technical or OEM-style cabin design
- sporty but not aggressive interiors
- commercial vehicles where a clean professional look is preferred
Comparison table: dark walnut vs light burl wood vs aluminium
| Feature | Dark walnut | Light burl wood | Aluminium |
|---|---|---|---|
| Style | Executive luxury | Bright classic luxury | Modern technical |
| Visual warmth | High | Very high | Low to medium |
| Best interior colours | Black, grey, beige, cream | Beige, cream, light grey, tan | Black, grey, silver, dark interiors |
| Best vehicle type | Executive car, van, truck, motorhome | Classic car, luxury van, beige interior vehicle | Modern car, van, truck, technical interior |
| Luxury impression | Very strong | Strong and bright | Modern premium |
| Sporty impression | Low to medium | Low | Medium |
| Best for full sets | Yes, if luxury effect is desired | Yes, especially with light interiors | Yes, for modern clean styling |
Popular Finish Options for Dashboard Trim Kits
Depending on the product line, dashboard trim kits can be offered in many finish styles. The finish name should always be matched with product images, sample swatches or preview pictures before ordering.
Wood and burl wood style finishes
- Dark Burl Wood
- Medium Burl Wood
- Light Burl Wood
- Classic Walnut
- Dark Walnut
- Light Oak
- Exotic Burl
- Executive Burl Hybrid
- Golden Birdseye Burl
- Honey Burl
- Japanese Elm
- Figured Cedar
- Cinnamon Mottled Eucalyptus
- Macassar Ebony
- Zebra Wood
- Monaco Walnut
- Natural Makassar
- Black Birdseye Maple
Carbon fibre style finishes
- Black Carbon Fibre
- Blue Carbon Fibre
- Red Carbon Fibre
- Silver Carbon Fibre
Solid colour and technical finishes
- Coal Black
- Racing Red
- Deep Orange
- Sunray Yellow
- Blue
- Green
- Gold
- Grey metallic
- Camo
- Technical wrap patterns
Wood finishes are usually the safest choice for classic luxury styling. Carbon fibre is best for sporty interiors. Aluminium and metallic finishes are best for modern technical interiors. Strong colours are best for custom vehicles and show-style interior themes.
How to Choose a Finish by Interior Colour
The same material can look very different depending on dashboard colour, seat colour and existing trim details. Use the interior colour as a guide before choosing the finish.
| Interior colour | Recommended finishes | Effect |
|---|---|---|
| Black interior | Dark walnut, dark burl wood, carbon fibre, brushed aluminium, piano black | Premium, sporty or modern depending on finish |
| Dark grey interior | Dark walnut, medium burl wood, aluminium, black carbon fibre | Balanced and professional |
| Light grey interior | Light burl wood, light oak, aluminium, medium burl wood | Clean and brighter |
| Beige interior | Light burl wood, honey burl, walnut, golden birdseye burl | Warm luxury style |
| Cream interior | Light burl wood, light oak, golden wood tones | Classic premium look |
| Brown or tan interior | Walnut, dark walnut, medium burl wood, honey burl | Natural and coordinated |
| Sport interior | Carbon fibre, aluminium, piano black, red carbon fibre | Dynamic and technical |
How to Choose a Finish by Vehicle Style
Executive cars
Executive cars usually look best with dark walnut, medium burl wood, exotic burl, piano black or aluminium. Dark wood gives a classic luxury effect, while aluminium gives a more modern premium effect.
Classic cars
Classic cars often suit burl wood, walnut, light oak and other warm wood finishes. A high-gloss domed wood surface can help recreate a traditional luxury interior style.
Sports cars
Sports cars usually suit carbon fibre, brushed aluminium, piano black or darker technical finishes. These finishes match black leather, bucket seats, sporty dashboards and performance styling.
Vans and motorhomes
Vans and motorhomes can benefit from burl wood, walnut, light burl wood or aluminium. Wood finishes create a warmer living-space atmosphere, while aluminium creates a clean commercial or modern conversion style.
Trucks and buses
Truck and bus interiors often have large dashboard areas. Dark burl wood, walnut and aluminium are strong choices because they visually upgrade plain interior panels. For large full sets, choose a finish that will not look too aggressive across the whole cockpit.
Custom and show vehicles
For custom builds, strong colours, camo, carbon fibre and technical patterns can create a more individual look. These finishes are more visible and should be chosen carefully if the vehicle is used for daily driving.
Care and Cleaning for High-Gloss Trim Surfaces
High-gloss 3D domed trim surfaces should be cleaned gently. The surface is designed for interior use, but aggressive tools or harsh chemicals can damage the gloss.
Recommended cleaning method
- Use a clean soft lint-free cloth.
- Remove fingerprints with gentle wiping.
- Use a mild glass cleaner only if suitable for the product surface.
- Apply cleaner to the cloth, not directly into dashboard buttons or electronics.
- Avoid abrasive pads, sharp tools and strong solvents.
Cleaning products to avoid
- abrasive polishing compounds
- rough sponges or scouring pads
- strong industrial solvents
- acetone on unknown plastic or coated surfaces
- silicone dressings on bonding areas before installation
- excessive liquid around switches and electronics
After installation
After installing a dashboard trim kit, avoid heavy cleaning, lifting edges or stressing curved parts during the first 24 to 72 hours. This helps the adhesive bond develop properly and reduces the risk of edge lifting.
Final Material Selection Checklist
Before choosing the material or finish for your dashboard trim kit, use this checklist.
Style checklist
- Do you want a luxury, sporty, technical or custom look?
- Does the finish match the dashboard colour?
- Does the finish match the seats, door panels and existing interior trim?
- Will the finish look good across a full set, not only on one small part?
- Do you prefer natural-looking wood grain or a controlled printed pattern?
- Do you want a high-gloss 3D domed surface?
- Do you want a classic OEM-style appearance or a strong custom appearance?
Material checklist
- Choose burl wood if you want warmth and luxury.
- Choose dark walnut if you want a deep executive look.
- Choose light burl wood if the interior is beige, cream or light grey.
- Choose carbon fibre if you want a sporty technical look.
- Choose aluminium if you want a modern clean dashboard style.
- Choose piano black if you want a minimalist glossy finish.
- Choose strong colours only if you want a visible custom interior theme.
Compatibility checklist
- Check vehicle make and model.
- Check production year and generation.
- Check facelift or pre-facelift dashboard version.
- Check automatic or manual gearbox.
- Check manual AC, automatic AC or no AC.
- Check navigation, radio and screen layout.
- Check heated seat buttons and switch locations.
- Check product diagram and number of trim pieces.
- Check that the selected material is available for the correct kit reference.
Frequently Asked Questions
Is burl wood better than carbon fibre for dashboard trim?
Neither is universally better. Burl wood is better for a luxury, classic or executive look. Carbon fibre is better for a sporty, technical or performance-inspired look. The best choice depends on your vehicle interior and the style you want.
What is 3D domed dashboard trim?
3D domed dashboard trim has a raised high-gloss clear coating over the decorative surface. This creates depth, rounded edges and a premium glossy appearance.
Is real wood veneer better than UV printed wood effect?
Real wood veneer is better if you want a genuine natural wood surface and unique grain variation. UV printed wood effect is better if you want consistent colour, repeatable patterns and more design flexibility.
Can UV printed wood effect still look premium?
Yes. A high-quality printed wood pattern combined with a glossy 3D domed clear coat can create a strong premium appearance, especially when the colour and grain are well matched to the vehicle interior.
Which finish is best for a black dashboard?
Dark walnut, dark burl wood, black carbon fibre, brushed aluminium and piano black usually work well with black dashboards. Choose wood for luxury, carbon for sport and aluminium for a modern technical look.
Which finish is best for a beige interior?
Light burl wood, honey burl, golden birdseye burl, light oak and walnut are usually good choices for beige or cream interiors because they add warmth without looking too heavy.
Is aluminium trim suitable for luxury vehicles?
Yes. Aluminium trim can create a modern premium appearance. It is less traditional than wood but works very well in clean, technical and contemporary interiors.
Can I mix wood and carbon fibre finishes?
It is usually better to keep one main finish across the interior. Mixing wood and carbon fibre can look inconsistent unless it is part of a deliberate custom design.
Does the finish affect installation?
The installation process is generally similar, but the shape of the kit, number of parts and dashboard layout affect installation time more than the finish itself. Always dry fit the parts before applying them.
Can I clean high-gloss domed trim with normal dashboard cleaner?
Use caution. Many dashboard cleaners leave residue or silicone. For the glossy trim surface, use a soft lint-free cloth and a mild cleaner suitable for glossy interior surfaces. Do not use abrasive products.
Important Compatibility Note
Material and finish selection is separate from vehicle compatibility. Always confirm that the dashboard trim kit matches your exact vehicle make, model, year, dashboard layout and equipment version before ordering or installation.
Vehicle manufacturer names and model names are used only for compatibility identification. The dashboard trim kit is an aftermarket interior accessory and is not presented as an original vehicle manufacturer product.
Dashboard Trim Kit Buyer Guide
Buyer Guides
Choosing the correct dashboard trim kit is not only about selecting a colour or finish. The most important step is confirming that the kit matches the exact vehicle interior layout, including model year, dashboard version, gearbox type, air-conditioning controls, heated seat buttons, navigation system, door panels and other equipment options.
This guide explains how to choose the correct dashboard trim kit for your vehicle, how to compare a full set with a smaller trim kit, and why automatic gearbox, manual gearbox, heated seats, manual AC, automatic AC or no AC versions can require different trim parts.
Buyer Guide Contents
- How to choose the correct dashboard trim kit for your vehicle
- Vehicle details you must check before ordering
- Why the product diagram is important
- Full set vs small set dashboard trim kits
- Automatic gearbox vs manual gearbox trim kit differences
- Manual AC, automatic AC and vehicles without AC
- Heated seats, switches and extra dashboard options
- Other compatibility variables to check
- Choosing the right finish and material
- Final checklist before ordering
- Frequently asked questions
How to Choose the Correct Dashboard Trim Kit for Your Vehicle
A dashboard trim kit is normally designed for a specific vehicle interior layout. Even when two vehicles have the same make and model name, the dashboard can be different because of production year, facelift version, gearbox type, air-conditioning system, navigation equipment, heated seat buttons, door switches or trim level.
Before ordering, do not rely only on the vehicle model name. Always compare the product title, reference number, quantity of trim parts and product diagram with your real dashboard and interior panels.
The correct dashboard trim kit should match:
- vehicle make
- vehicle model
- production year
- generation or chassis code, if available
- facelift or pre-facelift dashboard version
- left-hand drive or right-hand drive layout
- automatic or manual gearbox
- manual AC, automatic AC, dual-zone AC or no AC
- radio, navigation or multimedia screen version
- heated seat buttons and other switch positions
- door panel layout and window switch design
- number of trim pieces included in the kit
The safest method is to open the product diagram and compare each trim part with your vehicle interior before placing the order.
Vehicle Details You Must Check Before Ordering
Use the following table as a compatibility checklist. These details are especially important when several trim kit versions exist for the same vehicle model.
| Compatibility detail | What to check | Why it matters |
|---|---|---|
| Vehicle make and model | Check the exact vehicle brand and model name. | Many kits are vehicle-specific and do not fit similar-looking models. |
| Manufacturing year | Check the production year, not only the registration year. | A car registered in one year may belong to an earlier production version. |
| Generation or chassis code | Check codes such as W907, E46, B8, 8P, T5, NG or similar. | Different generations often have completely different dashboards. |
| Facelift version | Compare pre-facelift and facelift dashboard images. | Radio, vents, console and button positions may change after a facelift. |
| Left-hand drive or right-hand drive | Check whether the steering wheel is on the left or right side. | Some dashboard and door trim parts are mirrored or completely different. |
| Gearbox type | Check automatic, manual, semi-automatic or special selector layout. | The gear selector frame and centre console openings can be different. |
| Air-conditioning system | Check manual AC, automatic AC, dual-zone climate or no AC. | Climate control cut-outs are often different between versions. |
| Heated seats | Check if the vehicle has heated seat switches and where they are located. | Extra switches require different openings in the trim kit. |
| Navigation or radio | Check screen size, radio frame, multimedia unit and display layout. | Navigation and radio versions often use different trim shapes. |
| Door panels | Check electric windows, manual windows, mirror switches and door handle layout. | Door trim pieces must match the exact switch and handle positions. |
| Trim part quantity | Check whether the product includes 1, 5, 12, 24, 40, 60 or more pieces. | The number of parts shows whether it is a small kit, partial kit or full set. |
| Product reference | Check the new reference and original reference if shown. | References help identify the exact kit version in the catalog. |
Why the Product Diagram Is Important
The product diagram is one of the most important tools for choosing the correct dashboard trim kit. It shows the exact trim parts included in the set and allows you to compare the shapes with your vehicle interior.
Before ordering, compare the diagram with:
- air vent shape and position
- radio or multimedia frame
- navigation screen shape
- climate control panel
- hazard button location
- gear selector or gear lever surround
- ashtray, cup holder or storage compartment
- door switch panel
- heated seat button position
- mirror switch position
- dashboard side trims
If one important cut-out or switch position does not match, the kit may not be suitable for your vehicle. Do not modify, cut or force the trim part unless the product is specifically sold as a universal item. Vehicle-specific dashboard trim kits are designed to fit without on-car cutting.
Full Set vs Small Set Dashboard Trim Kits
Dashboard trim kits are available in different sizes. Some kits include only a few key parts, while others are full sets with many pieces for the dashboard, centre console, doors and additional interior areas.
Small dashboard trim kit
A small kit normally covers only the most visible areas of the vehicle interior. This may include the radio frame, climate control surround, gear selector frame or a few dashboard accents.
Small kit advantages
- lower price than a full set
- faster installation
- good for a subtle interior upgrade
- useful when only the centre dashboard area needs improvement
- easier to compare with the product diagram
Small kit limitations
- does not cover all interior trim areas
- door panels may not be included
- centre console parts may be limited
- the final look may be less complete than a full set
Full dashboard trim kit
A full set normally includes a larger number of trim parts. Depending on the vehicle, a full set may cover the dashboard, radio surround, climate control area, centre console, gear selector, door panels, switch surrounds, side trims and additional interior details.
Full set advantages
- complete interior transformation
- more uniform luxury appearance
- best choice for full dashboard and door trim upgrade
- ideal for wood, carbon, aluminium or piano black interior styling
- better visual consistency across the cabin
Full set limitations
- more parts to install
- longer installation time
- more compatibility variables to check
- higher price than a small set
- requires careful dry fitting before installation
Comparison table: full set vs small set
| Feature | Small kit | Full set |
|---|---|---|
| Typical coverage | Main dashboard or selected interior parts | Dashboard, console, doors and additional trim areas |
| Number of pieces | Usually fewer parts | Usually many parts, depending on vehicle |
| Installation time | Shorter | Longer |
| Visual effect | Subtle upgrade | Complete interior transformation |
| Best for | Simple refresh or budget upgrade | Premium complete interior styling |
| Compatibility checking | Still important | Very important because more parts must match |
Automatic Gearbox vs Manual Gearbox Trim Kit Differences
Automatic and manual gearbox vehicles often require different dashboard trim kits. Even if the dashboard looks similar, the centre console and gear selector area can be completely different.
Automatic gearbox trim kits
An automatic gearbox version may include trim parts around the gear selector, PRND indicator, automatic shift gate, centre console plate or larger selector surround.
Check for automatic gearbox:
- shape of the automatic selector surround
- PRND or gear position indicator
- straight or stepped selector gate
- sport mode or manual shift mode markings
- console buttons near the selector
- wood, black, silver or factory trim around the automatic selector
Manual gearbox trim kits
A manual gearbox version may include a different gear lever frame, shift boot surround or centre console shape. The opening around the manual gear lever is often smaller or shaped differently than the automatic version.
Check for manual gearbox:
- round or rectangular shift boot surround
- manual gear lever frame shape
- position of cup holders or ashtray near the gear lever
- console design around the handbrake
- button positions near the gear lever
Why this difference matters
If you order an automatic gearbox trim kit for a manual vehicle, the gear selector part may not fit. If you order a manual gearbox kit for an automatic vehicle, the centre console part may cover or leave exposed the wrong areas. Always compare the product diagram with the actual gearbox area in your vehicle.
Manual AC, Automatic AC and Vehicles Without AC
Air-conditioning controls are one of the most common reasons why dashboard trim kits differ. A vehicle may have manual air conditioning, automatic climate control, dual-zone climate control or no AC, and each version can require a different trim part.
Manual AC version
Manual AC usually has round knobs or simple rotary controls. The trim kit must match the exact number, position and diameter of these controls.
Check for manual AC:
- three rotary knobs
- two rotary knobs plus buttons
- fan speed dial
- temperature dial
- air direction dial
- AC button position
- recirculation button position
Automatic AC version
Automatic climate control often has digital displays, push buttons, dual-zone temperature controls or a different control panel shape. The trim around this area must match the exact panel.
Check for automatic AC:
- digital climate display
- dual-zone temperature buttons
- automatic mode button
- different button row layout
- larger or smaller climate control panel
- separate display or integrated display
Without AC version
Some vehicles have heating controls without air conditioning. These versions may have blank buttons, different symbols or a different control panel. A kit designed for AC may not fit a vehicle without AC.
Check for vehicles without AC:
- no AC button
- different heater control symbols
- blank switch locations
- different control panel shape
Why AC control version matters
Dashboard trim parts are cut around buttons, displays and knobs. If the AC version is wrong, holes may be in the wrong place or the trim may cover a control. Always check whether the product title or diagram says manual AC, automatic AC, aircondition, climate control or without AC.
Heated Seats, Switches and Extra Dashboard Options
Heated seat buttons and extra switches can change the correct trim kit version. In many vehicles, heated seat switches are located near the climate controls, gear selector, radio panel, centre console or door panel. A dashboard trim kit must have the correct openings for these buttons.
Common equipment options that affect trim fitment
- heated seat buttons
- electric seat buttons
- parking sensor button
- start/stop button
- traction control button
- fog light button
- hazard warning button position
- mirror adjustment switch
- electric window switches
- rear window lock button
- central locking button
- cup holder version
- ashtray or storage compartment version
- factory phone holder or multimedia control
Heated seat example
If one vehicle has heated seat buttons beside the climate controls and another vehicle has blank covers in the same location, the trim part may need different cut-outs. A trim kit with heated seat button holes may not look correct on a vehicle without heated seats. A trim kit without heated seat openings may cover the buttons on a vehicle that has them.
Switch position rule
Always check switch quantity and position before ordering. If your vehicle has one extra switch, one missing switch or a different button layout, choose the kit version that matches your dashboard exactly.
Other Compatibility Variables to Check
Besides gearbox and AC, several other interior details can affect dashboard trim kit compatibility.
1. Radio, navigation and multimedia version
Vehicles may have a basic radio, larger navigation unit, touchscreen, factory multimedia system, aftermarket radio or screen protector application. The trim kit must match the frame and display area.
- basic radio
- large factory navigation
- touchscreen display
- screen protector only
- radio delete or storage compartment
- aftermarket radio adapter frame
2. Digital cluster or analogue cluster
Some vehicles have different instrument cluster styles. This matters if the kit includes speedometer surround, display frame or screen protection parts.
- analogue dials
- digital cockpit
- small central display
- large virtual cockpit display
- screen protector instead of trim piece
3. Number of doors
A 2-door, 3-door, 4-door or 5-door vehicle may have different door panel trims and window switch panels.
- 2-door coupe
- 3-door hatchback
- 4-door saloon
- 5-door hatchback
- estate or wagon
- van or truck cab version
4. Door window switches
Door trim pieces must match the window switch panel. Manual windows and electric windows are usually different.
- manual window crank
- front electric windows only
- front and rear electric windows
- driver-side master switch
- mirror switch position
- child lock or window lock button
5. Dashboard colour and existing factory trim
The original dashboard colour does not usually change the shape of the trim kit, but it can influence the best finish choice. Dark interiors often work well with dark burl wood, piano black, carbon fibre or brushed aluminium. Light interiors may suit light burl wood, walnut, aluminium or custom colour finishes.
6. Truck, van and motorhome variants
Commercial vehicles may have more dashboard variants than passenger cars. For trucks, vans and motorhomes, check cab type, dashboard version, navigation unit, radio position, storage compartments and equipment level carefully.
- standard cab
- space cab or high cab
- left-hand drive or right-hand drive
- factory navigation or standard radio
- automatic or manual gearbox
- workshop, van, camper or motorhome conversion
7. Facelift and model-year changes
Vehicle manufacturers often change the dashboard during a facelift. A kit for an earlier production year may not fit a later facelift dashboard. Always compare the real dashboard shape, not only the vehicle registration date.
Choosing the Right Finish and Material
After confirming compatibility, choose the finish that best matches the interior style you want to create. The finish choice affects appearance, but it does not replace the need to choose the correct vehicle layout.
| Finish | Best for | Visual effect |
|---|---|---|
| Dark burl wood | Luxury interiors, classic cars, premium vehicles | Warm, elegant, high-gloss luxury look |
| Light burl wood | Light interiors, classic styling, beige or grey cabins | Bright premium wood appearance |
| Walnut or mahogany | Traditional executive interior styling | Deep wood tone with refined finish |
| Carbon fibre | Sporty interiors and performance styling | Technical, modern and dynamic appearance |
| Brushed aluminium | Modern interiors, technical design, clean dashboard style | Cool metallic OEM-style appearance |
| Piano black | Minimalist modern interiors | Glossy, clean and premium appearance |
If the vehicle already has factory wood, carbon or aluminium details, choose a finish that complements the original interior. If you want a complete change, a full set gives the most uniform result.
Final Checklist Before Ordering
Before placing your order, use this checklist to reduce the risk of choosing the wrong dashboard trim kit.
Vehicle compatibility checklist
- Vehicle make is correct.
- Vehicle model is correct.
- Production year or model year matches the product description.
- Generation, chassis code or facelift version is correct.
- Left-hand drive or right-hand drive layout is correct.
- Automatic or manual gearbox version is correct.
- Manual AC, automatic AC or without AC version is correct.
- Navigation, radio or multimedia version matches your vehicle.
- Heated seat buttons and extra switch positions match.
- Door panel and window switch layout matches.
- Quantity of trim parts matches the product diagram.
- Product diagram matches your real dashboard.
- Reference number matches the kit you want to order.
- Finish and colour are selected correctly.
When to contact us before ordering
Contact us before ordering if you are not sure which version fits your vehicle. The best information to send is:
- vehicle make, model and year
- dashboard photo from the driver seat
- photo of the radio and climate control area
- photo of the gear selector area
- photo of the door switch panel
- information about automatic or manual gearbox
- information about manual AC, automatic AC or no AC
- product reference or link to the kit you are considering
Clear photos help compare your interior with the product diagram and reduce the risk of ordering the wrong version.
Frequently Asked Questions
How do I know which dashboard trim kit fits my vehicle?
Check the vehicle make, model, production year, dashboard layout, gearbox type, AC controls, navigation system, door panels and product diagram. The correct kit should match your real interior, not only the vehicle name.
Is a full set better than a small kit?
A full set is better if you want a complete interior transformation. A small kit is better if you want a simple upgrade, lower price or faster installation. The best choice depends on how many interior areas you want to cover.
Can I use an automatic gearbox kit in a manual vehicle?
Usually no. Automatic and manual gearbox versions often have different centre console and gear selector shapes. Always choose the version that matches your vehicle.
Can I use a manual AC kit for a vehicle with automatic climate control?
Usually no. Manual AC and automatic climate control panels normally have different button, dial and display layouts. The trim part must match the exact control panel.
What if my car has heated seats?
Check whether the product diagram includes openings for heated seat buttons. If the heated seat buttons are located in an area covered by the trim kit, the kit version must match those buttons.
What if my vehicle does not have AC?
Vehicles without AC may have different heater controls or blank button positions. Choose the trim kit version that matches your exact dashboard controls.
Why are there several kits for the same vehicle model?
The same vehicle model can have different dashboard layouts depending on year, facelift, trim level, gearbox, AC system, navigation, heated seats, door switches and other equipment options.
Can I cut the trim kit if one opening does not match?
Vehicle-specific dashboard trim kits are designed to fit without cutting on the vehicle. Cutting can damage the finish and may affect the appearance. It is better to choose the correct version before ordering.
Does the number of pieces matter?
Yes. The number of pieces shows how much of the interior is covered. A 1-piece or 5-piece kit is very different from a 40-piece or 60-piece full set.
What should I do if I am unsure?
Compare the product diagram with your dashboard and send clear interior photos before ordering. Include the vehicle model, year, gearbox type, AC type and any important equipment such as heated seats or navigation.
Important Compatibility Note
Always confirm that the dashboard trim kit matches your exact vehicle make, model, year, dashboard layout and equipment version before installation. Do not apply a trim part if its shape, cut-out or position does not match your interior.
Vehicle manufacturer names and model names are used only for compatibility identification. The dashboard trim kit is an aftermarket interior accessory and is not presented as an original vehicle manufacturer product.
No reviews
Tap to zoom