Shopping Cart



Toyota Land Cruiser 1990-1994 Full Set Interior Dashboard Trim Kit
TYT-12A
€134.99
Tax included Manufacturing time 2-7 business days
Vehicle-specific decorative overlay kit for the existing interior surfaces of your Toyota Land Cruiser. Choose the finish and verify the parts diagram before ordering.
| Make | Toyota |
|---|---|
| Model | Land Cruiser |
| Model years | 1990-1994 |
| Generation | J80 |
| Generation built | 1990–2007 |
| Variant / specification | Full Set |
| Product type | 3D dashboard trim kit |
| Parts included | Not specified |
| Product reference | TYT-12A |
| How to check your version | Before ordering, check on your vehicle and compare with the parts diagram: radio / NAVI unit, transmission, climate control. Steering wheel position (LHD/RHD): select it in the option below. |
Toyota Land Cruiser 1990-1994 Full Set Interior Dashboard Trim Kit
Finish: High-gloss as shipped · matte with 1 coat of clear matt spray before fitting.
Is the kit available in matte?
The kit ships high-gloss. For a satin or matte look, spray one thin coat of clear matt aerosol lacquer for cars on the parts before fitting (for example SprayMax Klarlack matt or NOVOL Clearcoat Matt), let it dry, then fit as usual. One coat takes the gloss off; a second gives a flatter but slightly hazy look. Try a small part first. We don’t ship aerosols; you’ll find them in car accessory shops.
A different finish catches your eye the moment you open the door.
This decorative trim kit adds a new finish to the existing interior surfaces of your Toyota Land Cruiser. Choose from the finishes offered for this kit and keep the cabin layout you already know.
The useful part, at a glance
A coordinated finish across the supplied pieces helps the cabin look considered. The trim overlays the existing surfaces, so you are choosing a new appearance for familiar parts of the interior.
| Everyday result | A different colour or pattern on the interior areas covered by this kit. |
|---|---|
| What you fit | Vehicle-specific self-adhesive overlay pieces, matched against the supplied product diagram. |
| What you choose | The available finish and the correct equipment or steering-wheel version, where offered. |
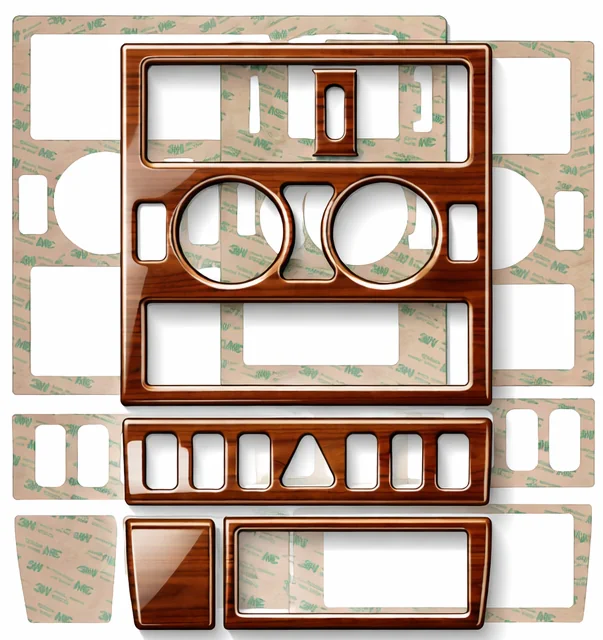
Illustration of trim finish and construction. Use the vehicle-specific product diagram to check the supplied shapes.
Check your vehicle and version
| Vehicle make | Toyota |
|---|---|
| Model | Land Cruiser |
| Manufacturing years | 1990-1994 |
| Listed variant | All Models and Versions; Full Set |
| Quantity of trim parts | Full Set / as shown in product diagram |
| Product reference | TYT-12A |
The layout check
Compare your radio or navigation opening, climate controls, switches, gear selector and steering-wheel position with the product diagram. Follow every equipment restriction in the product name and listed variant; a shared model name alone does not establish a match.
Finish and construction
| Appearance | Choose from the finishes available on this product page. Wood-style, carbon-look and other decoration names describe the selected appearance. |
|---|---|
| Protective surface | A high-gloss polyurethane or PU-domed surface is used where specified for the selected finish. |
| Fitting method | Adhesive-backed decoration applied to the prepared original surface. |
What the pictures show
The retained illustrations show the decorative effect and construction. Use the vehicle-specific diagram for the actual piece shapes and coverage; the selected finish determines the colour and pattern you receive.
Fitting, step by step
1. Compare before peeling
Lay out the pieces and check each one against its intended position while the backing is still attached. Take your time. The cut-outs and edges should line up naturally.
2. Prepare the bonding surface
Follow the installation instructions to remove dust, grease and surface-treatment residue. A clean-looking dashboard can still carry polish or silicone that affects adhesion.
3. Align, press and inspect
Position each piece carefully before applying firm pressure. Follow the kit instructions for temperature, pressing and the time needed before cleaning or stressing the edges.
Read the dashboard trim installation guide before you begin.
Before you add it to your basket
Confirm the vehicle version, compare the diagram and choose your finish. If an opening or control layout differs, ask about vehicle compatibility before fitting.

Illustration of trim finish and construction. Use the vehicle-specific product diagram to check the supplied shapes.
For trails, tracks and long trips
Long overland trips mean whole days at the wheel, a map on the passenger seat and a flask in the door pocket. On Toyota Land Cruiser the parts stick onto the existing surfaces and the dashboard stays in place. Nothing to strip out before the next trip, nothing to rebuild in the car park afterwards.
- Ships high-gloss; a thin coat of clear matt lacquer suits a matt wrap
- Wipe with a barely damp microfibre cloth
- No abrasives, even after a dusty day
Choose the finish that suits your 4x4 and check the diagram against your dashboard.
Preparing a cab that lives outdoors
- Shake out the mats and vacuum the dashboard: dust is the main enemy of a clean fit.
- Degrease every surface carefully, especially if you use protectant sprays on the plastics.
- Fit under cover, out of the wind, rather than at the trailhead, and keep a matt option in mind: one thin coat of clear matt lacquer before fitting, dried, then fit.
All kits for Toyota Land Cruiser · Toyota dashboard trim kits · Buyer guide · Material guide · Fitting guide · Contact & advice
5483230030804
The kit is fitted over the existing surfaces – no dismantling of the dashboard.
- Clean and degrease every surface; silicone and interior sprays stop the adhesive from holding.
- Dry-fit each part against the parts diagram before removing the backing film.
- In a cold car, warm the parts and the dashboard slightly first.
- Press each part firmly from the centre to the edges.
- Avoid washing or stressing the edges for 24–72 hours.
Every kit is made in your choice of finish, protected by a high-gloss 3D polyurethane layer.
- Wood (burl, walnut, maple): warm, classic, premium look.
- Carbon fibre: sporty and technical.
- Brushed aluminium: cool, modern, close to OEM.
- Piano black and solid colours: clean or personalised.
- The finish changes the look only – always check the version of your dashboard first.
A kit is made for one exact dashboard layout. Before ordering, check:
- make, model, production year and generation (before or after facelift);
- manual or automatic gearbox;
- manual or automatic climate control, radio / NAVI unit;
- the parts diagram and number of parts in the product photos;
- steering wheel position: select it in the option above the finishes.
No reviews
Tap to zoom